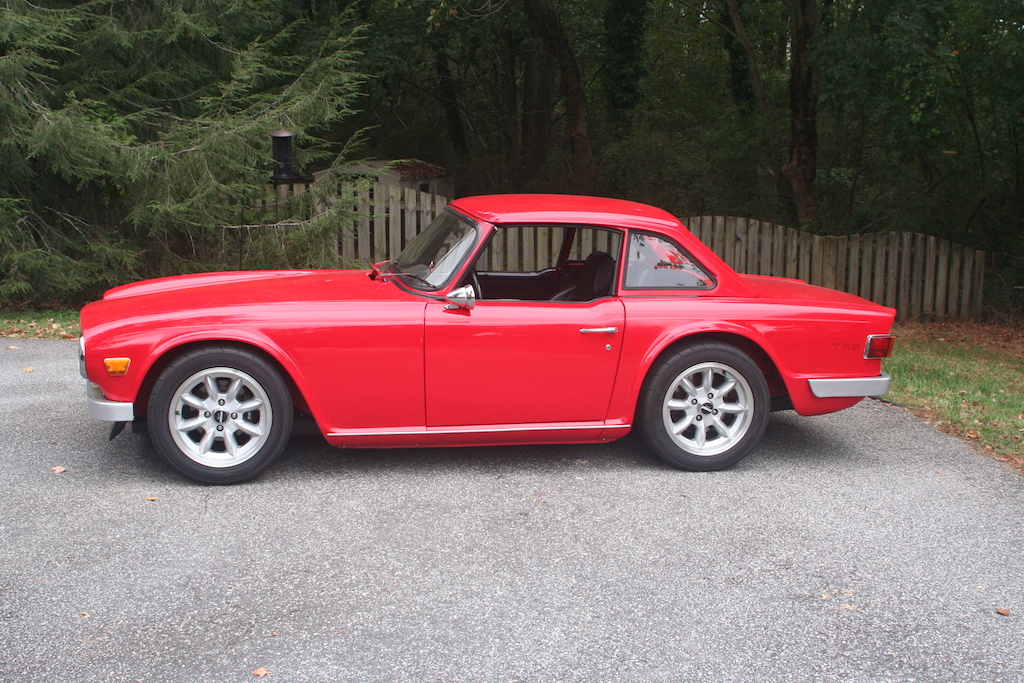
 Photo: bowtie6.com
A 1972 TR6 rebuilt with a custom frame and a GM Ecotec four-cylinder
An owner traces a TR6 restoration through a blog, starting with a V6 swap that eventually cracked the original chassis. The car was then rebuilt from scratch around a low-mileage Mallett-sourced Ecotec 2.4 engine, a bespoke square-tube frame, coilovers all round and a Ford 9-inch solid axle. By the last post, at over 20,000 miles, the owner was still refining details such as fuel system plumbing and PCM-controlled cooling fans.
Specs
As the owner states it.
- Engine
- GM Ecotec 2.4 litre twin-cam inline four, all-aluminium, variable valve timing, Solstice/Sky-sourced (Mallett take-out unit, 4 miles when purchased)
- ECM
- E67 PCM, programmable, tuned with HPTuners
- Gearbox
- AISIN 5-speed manual (from donor Solstice/Sky)
- Frame
- Bespoke square-tube chassis, hand-built to replace the failed original TR6 frame
- Front suspension
- Factory-style A-arms on new fabricated towers, adjustable coilovers, stock TR6 steering rack relocated to avoid bump steer
- Rear axle
- Narrowed Ford 9 inch solid axle with Motive full posi-traction differential, 3.80:1 ratio, custom Moser axles
- Rear suspension
- Four-point control-arm location with Heim joints, adjustable coilovers, rear sway bar
- Brakes
- Factory-diameter rotors front and rear with Wilwood four-piston front calipers; custom stainless brake lines
- Wheels
- Panasport 16x7in, Triumph bolt pattern
- Tyres
- 205/55-16 front, 215/55-16 rear
- Exhaust
- Hand-made stainless headers on GM Performance Parts flanges, 2.75in stainless tubing, Speedway Motors stainless bullet muffler, Supertrapp adjustable-disc tips
- Cooling
- Griffin aluminium radiator, SPAL electric fan, initially run by a Centech controller, later trialled off the PCM
- Fuel system
- Separate staging tank with high-pressure pump, Aeromotive adjustable fuel pressure regulator, braided lines, GM returnless-style fuel rail
- Electrical
- Custom-built engine and cab wiring using a donor HHR Ecotec harness, Weather Pack connectors throughout, dedicated fuse/relay panels
- Instruments
- VDO Vision electronic gauges with programmable speedo, quilted maple dash face on an aluminium backing panel
- Steering
- Custom fully adjustable tilt steering column with Borgeson u-joints, retaining the stock TR6 turn-signal switch
- Interior
- Scratch-built trunk liner in carpet and black plastic sheet, Dynamat Extreme sound deadening, scratch-built floorboard kick panels
- Battery
- Optima Red Top dry-cell battery in a custom aluminium box, hard-grounded to frame and engine
Parts used
What the owner names in the write-up, grouped the way the Parts page groups them. Where one of the shops we index lists the same thing for this car, it is shown underneath with a link to the shop.
Shop suggestions are being prepared. The owner's parts list is available below.
Engine 1
- GM Ecotec 2.4 litre twin-cam engineMallett Cars (via engine reseller)
Low-mileage take-out engine from a Solstice/Sky, replaced the original V6 as the main powerplant
Fuel & Ignition 4
- Aeromotive fuel pressure regulatorAeromotive
High-pressure adjustable regulator fitted with a fluid-filled gauge, replacing the non-adjustable GM unit
- Russell fuel line fittingsRussell (Edelbrock)
Push-connect fittings used on the returnless fuel system, later found unreliable and safety-wired
- Braided fuel lines
Replaced rubber E85-rated hoses feeding the fuel rail for a more durable connection
- HPTuners interface and softwareHPTuners
Used to tune and reprogram the Ecotec's E67 PCM, including fan control experiments
Cooling 3
- Griffin aluminium radiatorGriffin
Fitted and plumbed to suit the Ecotec's cooling requirements
- SPAL electric cooling fanSPAL
Fully shrouded fan fitted to the radiator, later wired for PCM control
- Centech cooling fan controllerCentech
Original standalone controller used to trigger the electric fan via a dedicated coolant temp sensor
Gearbox & Drivetrain 4
- AISIN 5-speed manual gearboxAISIN (GM Solstice/Sky sourced)
Paired with the Ecotec engine from the donor car
- Narrowed Ford 9 inch axle housing
Replaced the original IRS with a solid rear axle for durability
- Motive full posi-traction differentialMotive
Set up with 3.80:1 ratio in the new rear axle
- Moser axle shaftsMoser
Custom-length shafts made to fit the narrowed housing
Suspension & Steering 5
- Adjustable coilovers
Fitted at all four corners, replacing leaf/lever-arm suspension and factory IRS springs
- Heim-jointed control arms
Used to locate the rear axle in a four-point suspension setup
- Aftermarket steering rack mounts
Repositioned the stock TR6 rack to avoid bump steer on the new front end
- Borgeson U-jointsBorgeson
Used in the custom tilt steering shaft to allow it to pivot
- Custom tilt steering columnbuilt by cousin Jim Thompson
Hand-built replacement column allowing adjustable rake, retaining the stock turn-signal switch
Brakes 2
- Wilwood four-piston front calipersWilwood
Uprated calipers fitted to factory-diameter rotors for improved stopping power
- Stainless braided brake lines
Custom-made and bent to fit the new frame's rear brake circuit
Wheels & Tyres 2
- Panasport wheelsPanasport
16x7in wheels in Triumph bolt pattern fitted to the finished car
- SKF rear wheel bearingsSKF
Original replacement bearings that failed twice due to poor race hardening
Body & Trim 3
- Custom aluminium transmission tunnel cover
Made to clear the exhaust and later reworked to fit the AISIN gearbox
- DuPont ChomaOne single stage urethane paintDuPont
Used to repaint bare firewall areas reshaped for the new engine
- Euro-spec front turn signal lenses
Fitted to the front of the car as a trim detail
Interior 3
- Dynamat Extreme sound deadeningDynamat
Applied extensively under carpet and trim to quiet the cabin
- Quilted maple dash face
Custom-made dash surface mounted to an aluminium backing panel
- Aftermarket heater unit
Replaced a leaking original heater with a cheaper, more efficient, higher-pressure-rated unit
Electrical 5
- Donor HHR Ecotec wiring harness
Used as the base loom, cut and modified extensively to suit the TR6 installation
- Weather Pack connectorsCustomConnectorKits (later order)
Used throughout the engine and cab wiring for a serviceable, removable harness
- VDO Vision gaugesVDO
Electronic instrument set with programmable speedo, wired to suit the Ecotec
- Optima Red Top batteryOptima
Dry-cell battery mounted in a custom aluminium box with hard-grounded cables to frame and engine
- NOCO Genius 10 battery chargerNOCO
Used with its 12v supply setting to test and wire up interior courtesy lights
Other 2
- Speedway Motors stainless bullet mufflerSpeedway Motors
Fitted to the stainless exhaust system for reduced restriction
- Supertrapp exhaust tipsSupertrapp
Adjustable-disc mufflers used to tune exhaust note and backpressure
Photos
All 371 pictures in the write-up, in the order they were posted, shown from bowtie6.com. A picture opens larger here, with the way through to the page it is on.
2011-02-10 · ECOTEC Engine 5this post at bowtie6.com ↗
2011-02-27 · bowtie6 Starts to Come Apart (Again!)… 2this post at bowtie6.com ↗
2011-03-06 · Frame Failure – Continued 2this post at bowtie6.com ↗
2011-03-11 · bowtie6‘s V6 Engine 19this post at bowtie6.com ↗
2011-03-13 · bowtie6 Ready for Disassembly 5this post at bowtie6.com ↗
2011-03-18 · bowtie6‘s New Frame Takes Shape 3this post at bowtie6.com ↗
2011-03-19 · New Frame Update… 1this post at bowtie6.com ↗
2011-03-31 · Ecotec Motor Mounts, Rear Suspension and Headers… 5this post at bowtie6.com ↗
2011-04-03 · The New Frame… 3this post at bowtie6.com ↗
2011-04-09 · Painted Frame 3this post at bowtie6.com ↗
2011-04-17 · Replacing bowtie6‘s Front Suspension Bushings 7this post at bowtie6.com ↗
2011-04-20 · bowtie6‘s New Differential and Rear Suspension 10this post at bowtie6.com ↗
2011-05-02 · bowtie6‘s New Frame – Check It! 25this post at bowtie6.com ↗
2011-05-04 · ECOTEC, Meet Gearbox; Gearbox, Meet ECOTEC… 6this post at bowtie6.com ↗
2011-05-06 · ECOTEC in a TR6 7this post at bowtie6.com ↗
2011-05-12 · Final Pics of the New TR6 Frame 23this post at bowtie6.com ↗
2011-05-15 · bowtie6‘s ECOTEC Custom Intake 3this post at bowtie6.com ↗
2011-05-18 · bowtie6‘s Frame Failure – Revisited – 4this post at bowtie6.com ↗
2011-05-19 · Coilovers on a TR6 7this post at bowtie6.com ↗
2011-05-24 · Wiring Harness 1this post at bowtie6.com ↗
2011-05-30 · Wiring an ECOTEC engine 2this post at bowtie6.com ↗
2011-07-09 · bowtie6 Wiring – Part II – 3this post at bowtie6.com ↗
2011-07-16 · Wiring Up the Gauges… 2this post at bowtie6.com ↗
2011-09-04 · bowtie6 Reassembly – With Pictures – 9this post at bowtie6.com ↗
2011-11-05 · 400 Miles and Counting… 4this post at bowtie6.com ↗
2011-11-20 · Exhaust Changes… 7this post at bowtie6.com ↗
2011-11-30 · bowtie6‘s Muffler 1this post at bowtie6.com ↗
2011-12-03 · ECOTEC Fuel System 4this post at bowtie6.com ↗
2011-12-04 · ECOTEC Fuel System – Part 2 3this post at bowtie6.com ↗
2011-12-05 · TR6 Trunk Liner Kit 3this post at bowtie6.com ↗
2011-12-06 · ECOTEC Drive by Wire 7this post at bowtie6.com ↗
2011-12-16 · Carpet Kit for a TR6 4this post at bowtie6.com ↗
2011-12-18 · bowtie6‘s Tilt Steering 4this post at bowtie6.com ↗
2011-12-22 · bowtie6‘s Custom Wiring – Under the Hood 3this post at bowtie6.com ↗
2011-12-23 · bowtie6‘s Custom Wiring – Trunk 3this post at bowtie6.com ↗
2011-12-24 · bowtie6‘s Custom Wiring – Inside the Cab 2this post at bowtie6.com ↗
2011-12-31 · Backfire! 4this post at bowtie6.com ↗
2012-01-01 · Intake Repaired 2this post at bowtie6.com ↗
2012-01-02 · TR6 Bonnet Rod 1this post at bowtie6.com ↗
2012-01-11 · bowtie6‘s ECOTEC Engine 4this post at bowtie6.com ↗
2012-03-01 · Pair of TR6’s 1this post at bowtie6.com ↗
2012-03-28 · 2,400 Miles and Counting… 1this post at bowtie6.com ↗
2012-04-01 · Rear Wheel Bearing Replacement 7this post at bowtie6.com ↗
2012-06-16 · How Much Does a TR6 Weigh? 6this post at bowtie6.com ↗
2012-06-30 · Fuel Regulator Fittings 7this post at bowtie6.com ↗
2013-05-22 · So How Much Does a TR6 Weigh, Really? 2this post at bowtie6.com ↗
2013-06-17 · SuperTrapp Performance Tunable Exhaust 3this post at bowtie6.com ↗
2013-11-27 · 20,000 Miles and Counting… 1this post at bowtie6.com ↗
2014-12-23 · Triumph TR6 Bumpers 15this post at bowtie6.com ↗
2015-05-31 · Good Electrical Ground 4this post at bowtie6.com ↗
2015-06-06 · Coilover Repair 6this post at bowtie6.com ↗
2015-06-17 · Rebuilt Coilovers 1this post at bowtie6.com ↗
2015-06-20 · Rear Suspension Reassembly 10this post at bowtie6.com ↗
2015-08-01 · White and Red TR6’s 1this post at bowtie6.com ↗
2015-08-29 · Six or One Half Dozen of the Other 13this post at bowtie6.com ↗
2015-11-25 · Sunset 1this post at bowtie6.com ↗
2016-10-07 · LED Lights for a Triumph TR6 6this post at bowtie6.com ↗
2016-10-15 · TR6 Front LED Bulbs 2this post at bowtie6.com ↗
2016-12-31 · Fixing a Leaking 8 Inch Ford Rear End 8this post at bowtie6.com ↗
2017-06-24 · Yokohama ADVAN Neova AD08 on a Triumph TR6 6this post at bowtie6.com ↗
2017-07-09 · Bad Wheel Bearing 8this post at bowtie6.com ↗
2017-10-07 · Refining the Stance 8this post at bowtie6.com ↗
2019-05-12 · Ecotec Intake Manifold Upgrade 8this post at bowtie6.com ↗
2020-11-23 · Triumph TR6 Courtesy Light 4this post at bowtie6.com ↗
2021-05-29 · Ecotec Timing Chain Guide Bolt 7this post at bowtie6.com ↗
2023-04-16 · Fusebox Repairs 5this post at bowtie6.com ↗
2023-06-11 · How to Control Electric Cooling Fans with an E67 PCM 8this post at bowtie6.com ↗
2023-07-07 · New Fuel Pressure Regulator and Braided Lines 9this post at bowtie6.com ↗
How it was done
A V6 swap reaches its limit
After years of use and about 15,000 miles, the owner's TR6 with its built 3.4 litre V6, ported heads and reworked intake was making good power, but the non-programmable ECM meant no further tuning was possible. Soon after, the original frame developed a serious crack near the rear suspension mounts, ending the first phase of the car.
Diagnosing the frame failure
Inspection showed a torn frame rail on the passenger side and stress marks developing on the driver's side, despite the frame having been gusseted, boxed and reinforced beforehand. The owner concluded the factory TR6 frame, thin-gauge and spot-welded, simply could not survive sustained extra power, regardless of how well it was prepared.
Choosing the Ecotec and building a new chassis
Rather than a heavier LS V8, the owner chose a GM Ecotec 2.4, sourcing a virtually new take-out engine and matching AISIN gearbox from a batch pulled from Solstice/Sky cars. A new square-tube frame was fabricated from scratch, with new front suspension towers, adjustable coilovers, and mounts for a solid rear axle in place of the old independent rear.
New differential and rear suspension
A narrowed Ford 9 inch axle with a Motive posi-traction differential and custom Moser axle shafts replaced the old Nissan unit. The axle was located by a four-point suspension with Heim-jointed control arms and coilovers, with new stainless brake lines fabricated for the rebuilt rear end.
Fitting the engine and finishing the body
A trial fit showed the Ecotec sitting well back in the engine bay for better weight distribution, requiring some firewall reshaping for the oil filter and thermostat housing. Hand-made intake and header assemblies were built onto GM Performance Parts flanges, and the body panels were refitted and repainted where modified.
Wiring the car from scratch
Using a donor HHR wiring harness as the basis, the owner rebuilt the engine and cab wiring circuit by circuit, soldering and shrink-wrapping every join and using Weather Pack connectors so the harness could be serviced. Separate fuse and relay panels were built for the engine bay and interior, along with new VDO instruments and a custom-made adjustable tilt steering column.
Back on the road and early running
After about a year of work the car returned home under its own power, with the owner reporting a much stiffer chassis, sharper steering and a strong bite from the posi-traction rear axle. Sorting continued afterward, including muffler and exhaust tip tuning, trunk trim, and adjusting coilover spring rates to stop the front tyres scrubbing under hard cornering.
Long-term running repairs
Over many years and tens of thousands of miles, the owner dealt with recurring issues: two failed Chinese-made rear wheel bearings, a coilover rebuild after oil began seeping from the dampers, rodent damage to the engine fusebox wiring, and continued fettling of the fuel system and PCM-controlled cooling fan wiring, the last of these still being worked through in the final posts.
A summary in our own words. The full account, with all its detail, is the owner's: read it at bowtie6.com ↗
Worth knowing
- Do not assume even a well-reinforced original TR6 frame will survive sustained extra horsepower; build a proper replacement instead.
- Choose sealed rear wheel bearings carefully, as cheaply made replacements can fail from poor case-hardening within a few thousand miles.
- Coilover spring rates and mounting angles need real-world trial and error, not just paper calculations, to stop tyres scrubbing.
- Aftermarket push-connect fuel fittings can lose their locking spring over time and should be checked or safety-wired.
- Design mounts and suspension components so they can be easily removed again, since everything eventually needs service.
- Wiring a car from a donor harness takes far longer than expected, so budget generous time for cutting, soldering and connector work.